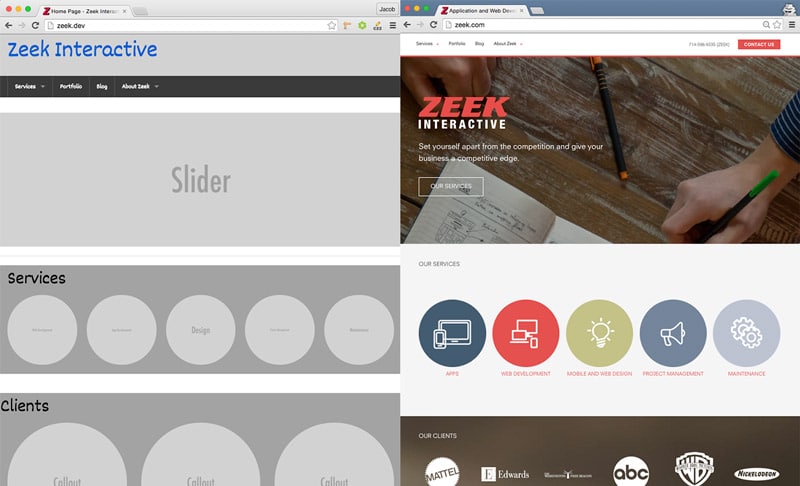
Recently, we redesigned our Zeek Interactive site, giving it an updated look (thanks to Kiran Robertson at Lovejoy Design) using newer technology such as HTML5 and CSS3. One unique difference in our process was the wireframing component. Rather than using a wireframing software such as Balsamiq, InvisionApp or Photoshop, we decided to wireframe in the browser, which essentially means bypassing the wireframe software and instead using code to make a living, breathing visualization of the site. This makes having an Agile design workflow much easier for us to manage: a truly iterative process doesn’t have to wait for revised Photoshop files.
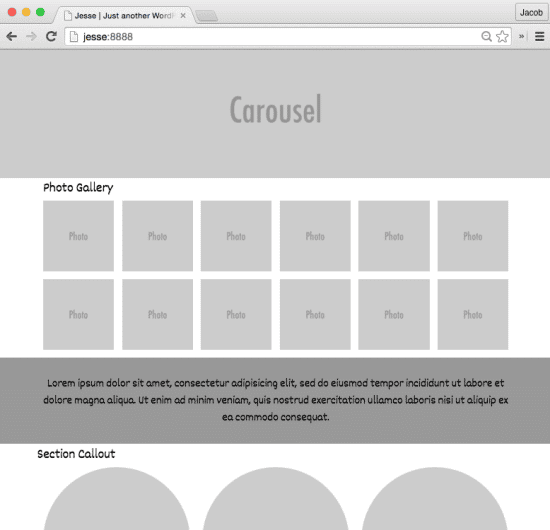
As part of the process, we used our Heisenberg starter theme to create a theme specifically for wireframing in the browser, and we’ve made it available to everyone. Naturally, we’re calling it Jesse. I’ll have more on that later in this post.
A wireframe is a blueprint for a website or app. The goal of the wireframe is to map out how elements will be laid out on pages across your site. It is an opportunity to show out how site elements such as navigation, content, forms and menus will related to one another.
One important factor in a wireframe is that there are limited design elements introduced at this stage of the building process. This gives stakeholders a focused view on content, structure and element relationships across different viewports rather than design elements such as colors and typography among others.
Why wireframe in the browser?
At Zeek, we take pride in working fast and finding new ways to accomplish tasks. Since we are all developers at heart, using code and the browser made sense to use rather than using 3rd-party software. Starting in the browser felt easy and seamless for us, especially since we generally use Foundation for our custom WordPress themes we build for clients.
Reasons to consider wireframing in the browsers
- Demonstrate JavaScript/CSS animation. If you’re working on a site with high levels of animations/interactivity, using the browser can give you the opportunity to demonstrate how things will behave, especially across multiple browsers and devices.
- Site browsing. Because you’ve made an actual site, stakeholders can navigate throughout the site getting valuable UX feedback on user flows (registration, sign-ups, purchases, etc) that a flat wireframe may not be able to provide.
- Sharing. You can provide the stakeholders a URL to your wireframe that is accessible anywhere – no need to invite someone to a space or email large files around.
- Responsiveness. Working in the browser can truly give team members a live indication of how a site will look at different viewports across devices and browsers.
- Speed (especially if you use a front-end library) – front-end libraries such as Foundation, Bootstrap and Bourbon come with common site elements (grid systems, modals, navigation, sliders, etc) that require minimum markup.
Reasons to avoid wireframing on the browser
- Limited collaboration/feedback. Browsers don’t have a way to provide collaboration among stakeholders the way 3rd-party wireframing softwares do. If adding comments and replies throughout the wireframe is critical to your workflow, wireframing in the browser may not be an ideal choice for your team.
- Can be a hinderance if not comfortable with code of front-end libraries.
- No paper trail. Some teams keep the wireframe as a separate document for reference or billing.
- A site consisting of a lot of custom post types and custom fields. It may take you longer to set up all of these different customizations in WordPress than the time you’d save using the browser.
The Process: Wireframe in the Browser
We’ve developed a WordPress wireframe theme named Jesse, which is a fork of Heisenberg, our WordPress starter theme. It’s built on top of Foundation, Underscores, Gulp.js, and Sass, making developing fast and easy.
I’ll walk you through the process – get ready to code and take notes!
Step 1: Back to basics with pen and paper
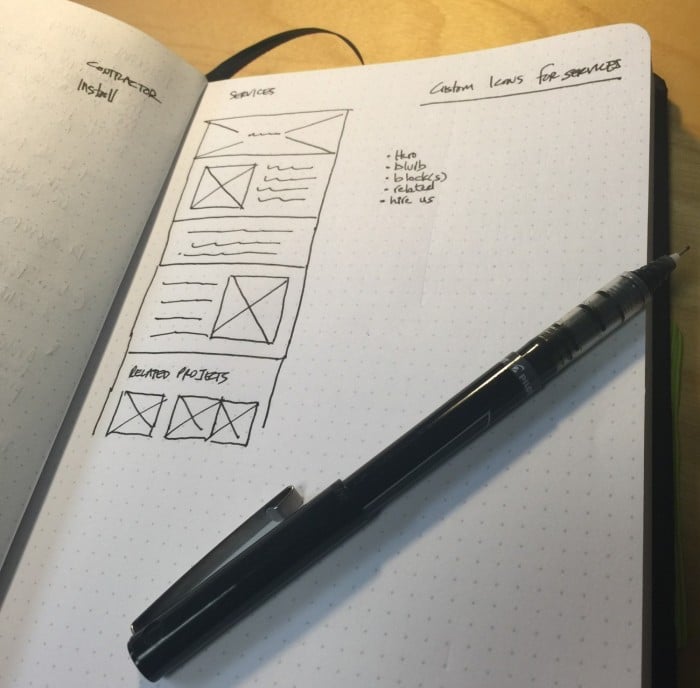
While it’s tempting to head right into code after coming up with content strategy, I find it valuable to take out a pen a paper and begin sketching out the wireframe. In regards to tools, I love using my Behance dot grid notebook and Pilot Precise v7 pen.
In a development perspective, sketching things out also gets me thinking about the HTML, PHP and Sass I’ll be using in the future to layout and style the site. As an example, our content strategy called for a lot of icon/text and screenshot/caption pairings. This was an awesome opportunity for me to consider flexbox for a lot of vertical centering and see how it tested in different browsers.

Step 2: Use a good wireframe theme and code away
We didn’t find a wireframing theme we loved for WordPress, so we decided to build our own (Refresher: how to use our Heisenberg starter theme to quickly build custom WordPress themes). I have to admit, knowing Foundation will make your life easier when wireframing; however, don’t feel intimidated if you don’t know Foundation. They’ve done an awesome job with their presentational classes and extensive documentation. Try it and you’ll be up and running in no time. Our founder Steve also has a rad tutorial on WordPress TV on how to use WordPress with Foundation.
The great thing about this process is that you don’t have to stick with Foundation. If you’re not #teamFoundation, feel free to strip out Foundation and add in something you’re used to working with like Bootstrap, Bourbon or Susy – or even something that you’ve built in-house. We’re a Foundation shop, so it’s natural for us to be using it when we wireframe.
The benefit of adding on a front-end library to a wireframe theme is that you have a treasure chest full of front-end UI elements that you can drop in similar to wireframe softwares. This includes modals, navigation, pagination, and more.

Step 3: Step back and navigate through the site
Before handing the site off for review by a peer or client, explore the site. This includes responsive elements at different breakpoints. What you’ll find is a lot of unexpected results that weren’t considered at the early stages of planning.
For us, this was a great time to get feedback on some animation type elements that we explored during our early planning stages. For instance, on the homepage, we thought it would be a good idea to have a thumbnail flipping effect in our portfolio section. When a user moused over a portfolio thumbnail, the image would flip around like a card showing a different image. When the mouse left the image, the thumbnail would flip back to its original state. However, after quickly building a prototype and seeing it within the living wireframe in the browser, we quickly realized that the UX was jagged.

Step 4: Communicate with the designer
Reach out to the designer so she can start following along and getting a sense of how the content strategy is flowing in the browser. Our process created a nice back-and-forth, iterative flow since there wasn’t a big reveal process where I’d send off a polished wireframe PDF file. I’d reach out to the designer and ask questions about responsiveness, navigation flow and animation elements. This gave her a really good sense of how the site would come to fruition.
Step 5: Build
Once the designer shipped off her design, I ended up using the existing code-base in the wireframe to build our the custom WordPress theme, which helped me save a ton of time because a lot of my architecture, HTML and PHP was already laid out.

Final Thoughts
Wireframing in the browser isn’t for everyone. As always, communicate your process to all stakeholders, get buy in and iterate as you go. However, if you’re finding that using wireframing software is slowing you down or not fulfilling a design/UX/concept need, give wireframing on the browser a shot.
What are you using these days to wireframe? Have you experienced wireframing on the browser? I’d love to hear your thoughts!
